Unlock the Secret to Perfectly Crispy Kale Chips Every Time
Craving a satisfyingly crunchy snack that's also incredibly good for you? Look no further than homemade kale chips! Forget those expensive, often over-salted store-bought versions. Learning how to make kale chips in the oven is surprisingly simple, transforms a humble leafy green into an irresistible treat, and puts you in complete control of the flavor. Whether you're a seasoned home cook or just starting your culinary journey, this comprehensive guide will equip you with all the tips and tricks to achieve that coveted crispy perfection.
Kale, often hailed as a superfood, is packed with vitamins A, C, and K, as well as essential minerals and antioxidants. However, its natural bitterness and fibrous texture can be an acquired taste for some, especially the younger, pickier eaters. Roasting kale in the oven, however, magically mellows its flavor and gives it a delightful crispiness that even skeptics find hard to resist. It’s a brilliant way to incorporate more nutrient-dense vegetables into your diet without feeling like you're sacrificing taste. These easy oven-baked kale chips quickly become a go-to healthy snack for movie nights, afternoon cravings, or even as a crunchy topping for soups and salads.
Gather Your Simple Ingredients
One of the best aspects of making kale chips is the minimal ingredient list. You likely have most of these staples in your pantry already! The magic happens when these few components come together under the gentle heat of your oven.
- Fresh Kale (any variety): Curly kale is a popular choice due to its ruffled edges that hold seasoning well and crisp up beautifully. Lacinato (dinosaur) kale also works wonderfully, though its flatter leaves might require slightly more attention to prevent burning. A large bunch will yield a surprisingly small amount of chips once baked, so don't be shy!
- Olive Oil (or alternative): Extra virgin olive oil imparts a delicious flavor, but you can also use avocado oil, grapeseed oil, or even melted coconut oil. The key is a light, even coating. An olive oil spray can be particularly effective for ensuring thorough coverage without overdoing it, which is crucial for crispiness.
- Seasoning Essentials:
- Fine Sea Salt: Absolutely essential for bringing out the flavor and enhancing the crispness.
- Freshly Ground Black Pepper: Adds a subtle kick.
- Garlic Powder: A staple for savory depth.
- Smoked Paprika: Delivers a beautiful color and a smoky, earthy note.
- Optional Flavor Boosters:
- Grated Parmesan Cheese: For a deliciously cheesy, savory coating. Ensure it's finely grated to stick well.
- Nutritional Yeast: A fantastic dairy-free alternative for a "cheesy" flavor, rich in B vitamins.
- Onion Powder: Complements the garlic powder perfectly.
- Chili Powder or Cayenne Pepper: If you like a little heat.
- Everything Bagel Seasoning: Offers a complex savory, garlicky, and oniony crunch.
Step-by-Step Guide: How to Make Kale Chips in the Oven
Achieving perfectly crispy kale chips boils down to a few critical steps, particularly in preparation and baking. Follow these instructions carefully, and you'll be enjoying your homemade chips in no time.
1. Prepare Your Kale with Precision
- Destemming: Kale has a tough, fibrous stem that isn't pleasant to eat. Hold the stem with one hand and, with the other, pinch the base of the leaves and slide your fingers up and away from the stem to peel the leaves off. Discard the stems.
- Tear into Bite-Sized Pieces: Tear the de-stemmed kale leaves into roughly 2-inch, chip-sized pieces. Aim for relatively consistent sizes for even baking.
- Thorough Washing: Rinse the kale leaves thoroughly under cold water to remove any dirt or debris.
- Crucial Drying: This is arguably the most important step for crispy kale chips. Any residual moisture will steam the kale instead of baking it, resulting in soggy chips.
- Salad Spinner Method: If you have one, a salad spinner is your best friend here! Give the kale a vigorous spin until all visible water is removed. You'll be surprised how much water collects in the bottom.
- Towel Method: If you don't have a salad spinner, place the washed kale on a clean kitchen towel or paper towels. Gently pat and press the leaves dry, rotating them until they feel completely dry to the touch. Don't skip this step!
2. Preheat and Prepare Baking Sheets
Preheat your oven to 325°F (160°C). While some recipes suggest 350°F, a slightly lower temperature allows the kale to dehydrate and crisp up without burning too quickly, making it more forgiving, especially for beginners. Line two large, rimmed baking sheets with parchment paper. This prevents sticking and makes cleanup a breeze. Adjust your oven racks to accommodate both pans for simultaneous baking.
3. Season and Toss
- In a large mixing bowl, whisk together your olive oil, garlic powder, paprika, salt, and freshly ground black pepper. If using olive oil spray, you can spray the kale directly in the bowl and then add the dry seasonings.
- Add the thoroughly dried kale leaves to the bowl. Using your hands (the best tool for this!) or tongs, gently toss and massage the kale until every piece is lightly and evenly coated with oil and seasoning. Be gentle but thorough – ensure no dry spots remain, but avoid saturating the kale in oil, as too much oil can lead to soggy chips.
- If using grated Parmesan cheese or nutritional yeast, sprinkle it over the kale now and toss gently to combine.
4. Arrange and Bake
- Arrange the seasoned kale leaves in a single layer on the prepared baking sheets. Do not overcrowd the pans! Overlapping kale will steam rather than crisp, preventing that perfect crunch. If necessary, use a third baking sheet.
- Bake for 15-20 minutes, or until the chips are crispy and slightly browned but not burnt. At the 7-minute mark, rotate the pans between the racks and also front to back to ensure even baking. Continue baking for another 7-10 minutes, checking frequently. The exact baking time can vary depending on your oven and the thickness of your kale, so keep a close eye on them, especially during the last few minutes. They can go from perfectly crisp to burnt very quickly.
5. Cool and Enjoy
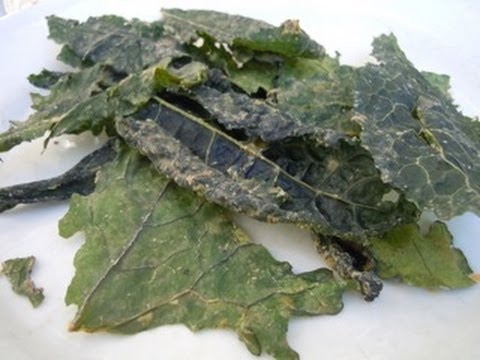
Once baked, remove the baking sheets from the oven. Let the kale chips cool directly on the baking sheets for at least 5-10 minutes. As they cool, they will continue to crisp up, achieving that satisfying shatter-like texture. Serve immediately and enjoy your perfectly crispy, healthy snack!
Expert Tips for Ultimate Crispiness and Flavor
Mastering how to make kale chips in the oven involves a few critical techniques that can elevate your results from good to absolutely amazing.
- Dryness is Divinity: We can't stress this enough. If your kale isn't bone-dry, it won't be crispy. Use a salad spinner! If you're looking for more ways to transform kale into a healthy snack, remember this golden rule for any roasted greens.
- Don't Over-Oil: A light, even coating is key. Too much oil will make them greasy and soggy. Using an oil spray can help distribute it perfectly.
- Single Layer is Sacred: Overcrowding a baking sheet is the arch-nemesis of crispiness. Give your kale room to breathe and bake evenly. Use multiple sheets if needed.
- Low and Slow (or Controlled Heat): While some recipes use 350°F, starting at 325°F offers a gentler bake, allowing the kale to dehydrate and crisp up without burning. If you prefer 350°F, reduce the baking time and watch them like a hawk.
- Rotate for Evenness: Ovens often have hot spots. Rotating your baking sheets halfway through baking ensures all your chips get an even amount of heat.
- Cooling is Crucial: Patience is a virtue! Kale chips continue to crisp as they cool on the baking sheet. Resist the urge to dive in immediately.
- Experiment with Seasonings: Don't be afraid to get creative! Beyond the basics, try a sprinkle of nutritional yeast for a cheesy, umami flavor (great for dairy-free diets), a dash of chili powder for heat, or even a squeeze of fresh lemon juice after baking for brightness. For those short on time, learning how to bake a healthy snack in under 30 minutes is a game-changer, and experimenting with seasonings keeps things exciting.
Troubleshooting Common Issues
- Soggy Chips: This almost always comes down to either insufficient drying of the kale or overcrowding the baking sheet. Ensure your kale is bone-dry and baked in a single layer.
- Burnt Chips: Likely due to too high a temperature or baking for too long. Keep a close eye on them, especially towards the end. If your oven runs hot, consider reducing the temperature slightly or shortening the baking time.
Storing Your Kale Chips
Kale chips are best enjoyed fresh, right after they've cooled to their crispiest peak. However, if you have leftovers, store them in an airtight container at room temperature for 1-2 days. They may lose some of their crispness over time, but a quick re-bake in a 250°F (120°C) oven for 5-10 minutes can help revive their crunch.
Conclusion
Making delicious, perfectly crispy kale chips in your own kitchen is a rewarding experience that proves healthy eating can be incredibly flavorful and satisfying. By focusing on proper kale preparation, a light hand with oil, and meticulous baking, you can master how to make kale chips in the oven and create a snack that rivals any store-bought alternative. Experiment with different seasonings, discover your favorite variety of kale, and enjoy this versatile, nutrient-packed treat whenever a craving strikes. Get ready to transform your perception of healthy snacking!
